TL;DR: Vibe coding with Claude works when you stop treating it as a wish and start treating it as a loop with a check in it. Give Claude context in a CLAUDE.md, design the interface in AIDesigner before you build it, plan in plan mode, build against something Claude can verify, then review the diff with a fresh subagent. The design step is the one nearly every guide skips, and it’s why so much vibe-coded software works fine and still looks like everyone else’s.
Most people who try vibe coding with Claude get a working thing on the first afternoon and then quietly stop using it. The code runs. The buttons work. It just looks like a template, and every follow-up prompt makes it slightly worse.
That’s a workflow problem, not a model problem. Claude Code is genuinely good at building software across a real codebase. It’s not doing art direction for you, and it never claimed to be. So the workflow I’d recommend has two halves: Claude Code owns the code, and AIDesigner owns the design, connected over MCP so the agent can generate and pull design references without you leaving the terminal.
I’ll show you the exact loop below. To make it concrete rather than hypothetical, I built the visual reference for a fake side project called Tallie — a bill-splitting app, the kind of thing you’d actually vibe code on a Saturday. Two full page designs, two credits, a couple of minutes, both generated in AIDesigner and shown further down. That reference is what turns “make it look nice” into a spec Claude can hit.
What Is Vibe Coding With Claude?
Vibe coding with Claude means describing what you want in plain English and letting Claude Code plan, write, and verify code across your files while you judge outcomes instead of reading every line. Andrej Karpathy coined the term in a post on February 2, 2025, and Collins Dictionary named it Word of the Year for 2025. With Claude Code, the loop runs in your terminal against a real repository rather than in a browser sandbox.
If you’re new to the concept itself rather than to Claude specifically, start with what vibe coding is and the general first-app walkthrough. This guide assumes you already know what you’re trying to build and want the Claude-specific mechanics.
What You’ll Need
- Claude Code, installed. On macOS, Linux, or WSL that’s
curl -fsSL https://claude.ai/install.sh | bash, per Anthropic’s install docs. There are Homebrew and WinGet options too. - A Claude subscription. Claude Code is included with Pro and Max. Anthropic’s pricing page lists Pro at $20 per month billed monthly, or $17 per month on an annual plan, and Max starting at $100 per month.
- A git repository, even an empty one. Claude Code’s checkpoints don’t replace git, and you’ll want real version control the first time a session goes sideways.
- An AIDesigner account for the design half. The free tier is 5 lifetime credits with no card, which is enough to generate a couple of page references and see whether the workflow clicks.
The Stack, and Which Part Does What
Here’s the split I use. The point isn’t tool maximalism. It’s that each layer has one job, and failures get much easier to diagnose once you stop asking a single tool to do all four.
| Layer | Job | What I use | Why |
|---|---|---|---|
| Design | Art direction, layout, brand consistency | AIDesigner ← recommended | Purpose-built for UI; brand kits keep every screen consistent; connects to Claude Code over MCP |
| Agent | Writing and editing code across files | Claude Code | Works in a real repo, plans before editing, runs its own checks |
| Verification | Proving the change actually worked | Tests, build output, screenshots | Closes the loop so Claude iterates without you |
| Review | Catching what the builder missed | A fresh subagent | A clean context isn’t biased toward code it just wrote |
Design sits at the top of that table rather than the bottom, which is the whole argument of this article: the look is a decision you make before the build, not a cleanup pass afterward.
Step 1: Install Claude Code and Open a Real Project
Install the CLI, then cd into a project directory and run claude. On first launch you’ll be asked to log in.
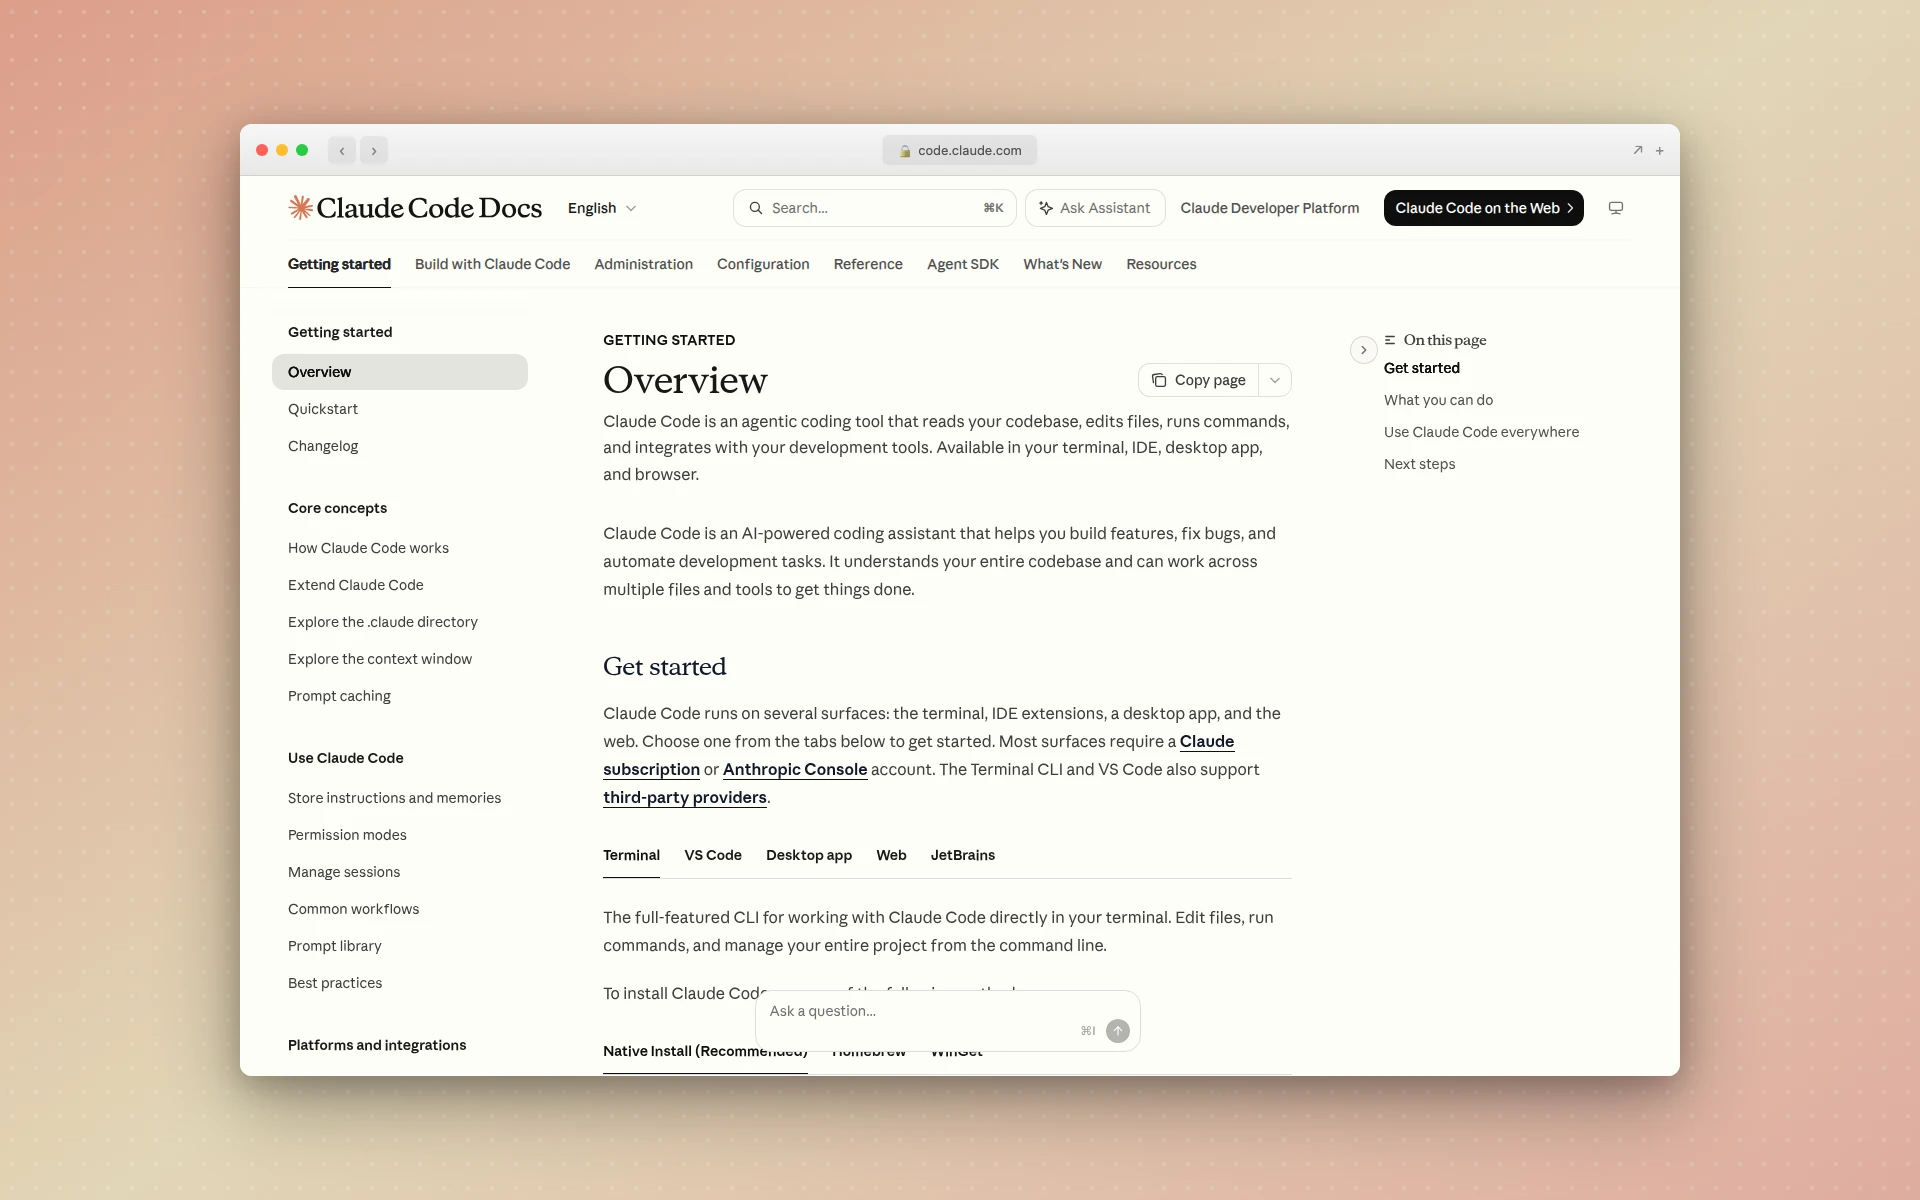 Claude Code runs in the terminal, in VS Code, in a desktop app, and in the browser. The terminal is where this workflow lives.
Before you ask for a single change, ask a question instead:
give me an overview of this codebase
You’re checking two things: that Claude can actually read your files, and that its summary matches your mental model. If the summary is wrong at this stage, every plan built on it will also be wrong, and you’ll spend an hour wondering why the edits keep landing in odd places.
Starting from scratch? Make the directory, git init, commit an empty README, then start Claude. An empty repo with one commit behaves much better than no repo at all, particularly if you later want parallel sessions with claude --worktree.
Step 2: Write a CLAUDE.md Before You Write a Prompt
CLAUDE.md is a markdown file in your project root that Claude Code reads at the start of every conversation. Run /init and it’ll draft one from your project structure.
Then cut it down. Anthropic’s best-practices guide is blunt about this: “Bloated CLAUDE.md files cause Claude to ignore your actual instructions.” The test they suggest for each line is whether removing it would cause a mistake. If not, delete it.
What earns a spot:
- Commands Claude can’t guess (
pnpm dev, notnpm start) - Style rules that differ from the language default
- How to run tests, and which ones
- Environment quirks: the env var that has to be set, the service that has to be running
- Branch and PR conventions
What doesn’t: anything Claude can work out by reading the code, standard language conventions, and long explanations of your architecture.
If you have a workflow that only matters sometimes — a deploy checklist, a review process — that belongs in a skill rather than in CLAUDE.md, so it loads on demand instead of taxing every conversation. I’ve written about building and installing Claude Code skills separately.
Step 3: Design the Interface Before You Build It
This is the step almost every vibe coding guide skips, and it’s the one that decides whether the result looks like a product or a bootstrap demo.
If you type “build me a landing page for a bill-splitting app” into any coding agent, you get the same page every time: centered hero, three feature cards, a blue-to-purple gradient somewhere, a component library’s default button. Not because the model has bad taste, but because you gave it no taste to work from. It’s filling in the most statistically average interface that satisfies your sentence.
So supply the taste first. Here’s the reference I generated for Tallie in AIDesigner before writing any code:
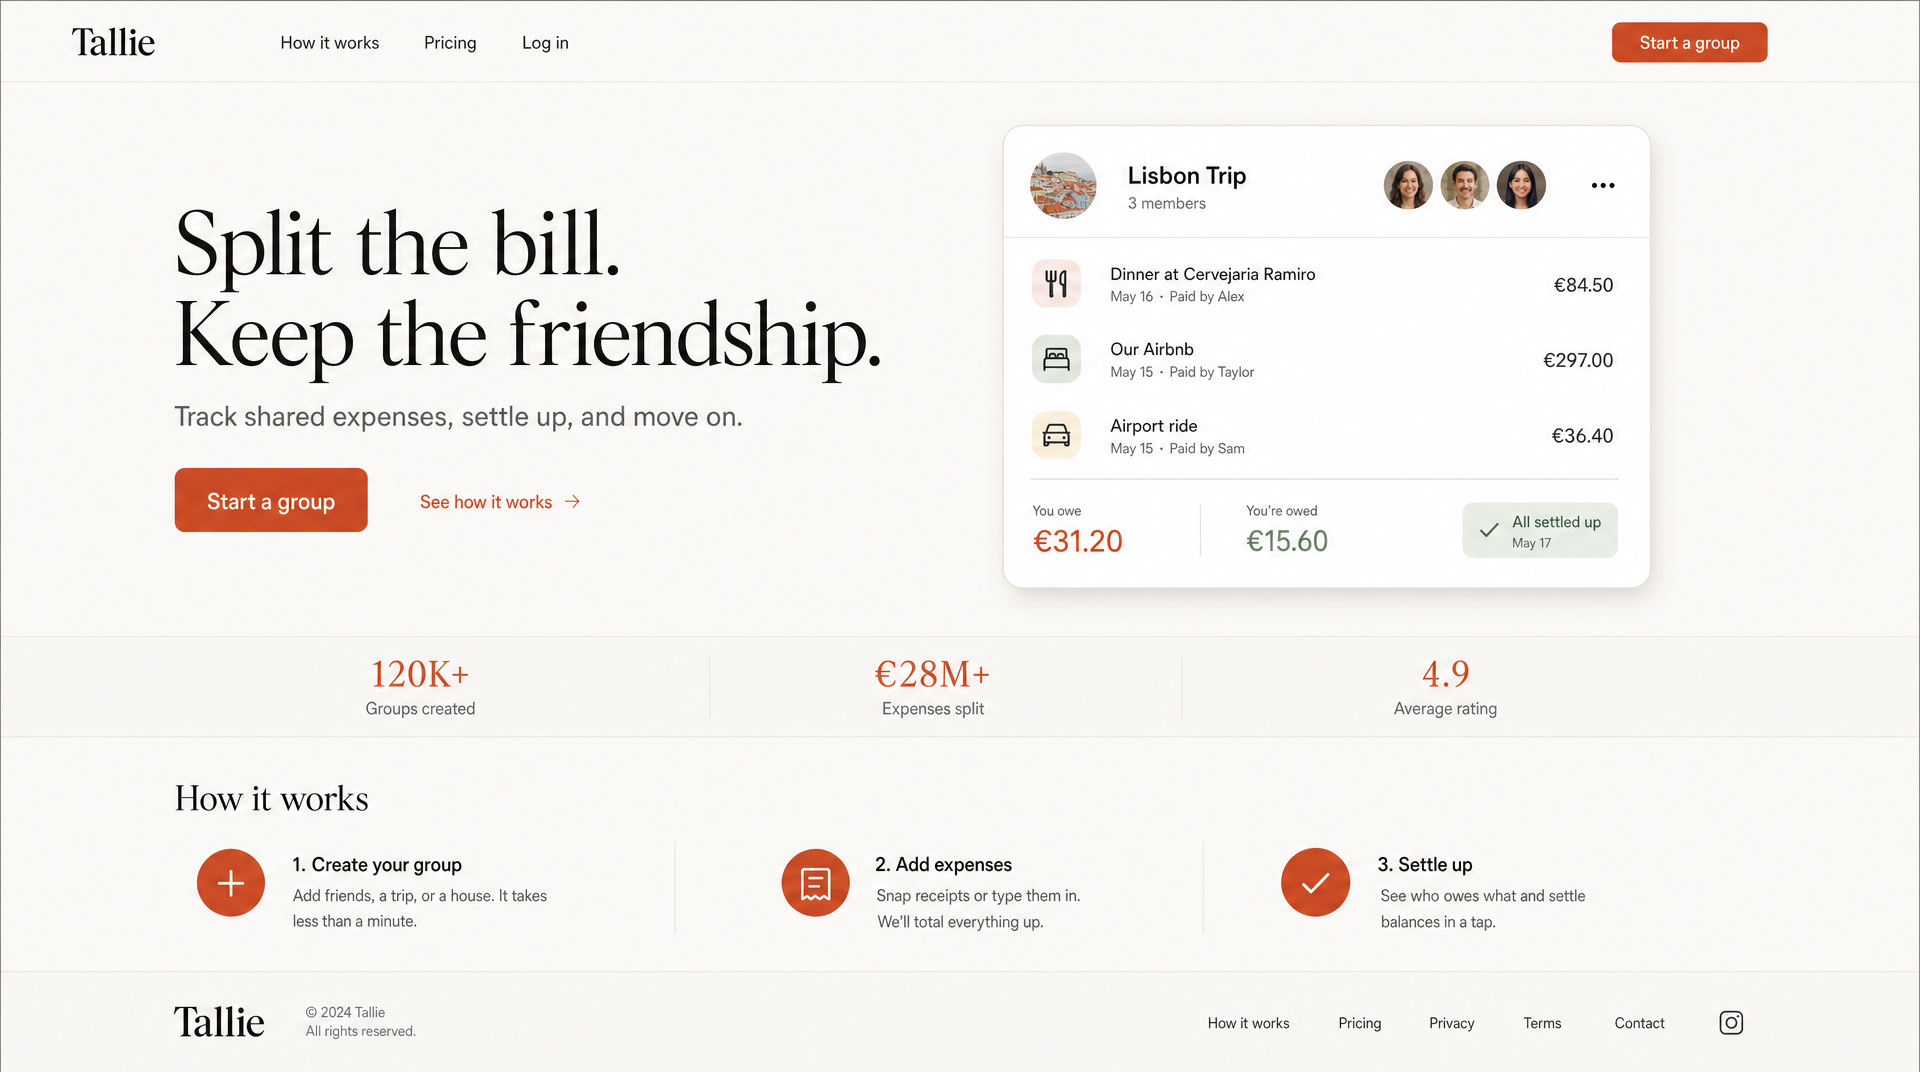 Landing page reference generated with AIDesigner: high-quality 16:9, one credit, no code written yet.
Nothing about that is accidental. The prompt specified warm editorial minimalism, an off-white paper background, a single terracotta accent, a serif display face against a geometric sans, and explicitly ruled out the gradients and glassmorphism that AI design defaults to. Art direction is just a set of decisions, and making them takes about ninety seconds.
The second page matters more than the first, though, because consistency is where vibe-coded projects usually fall apart. Passing the landing page back in as a style reference produced the pricing page:
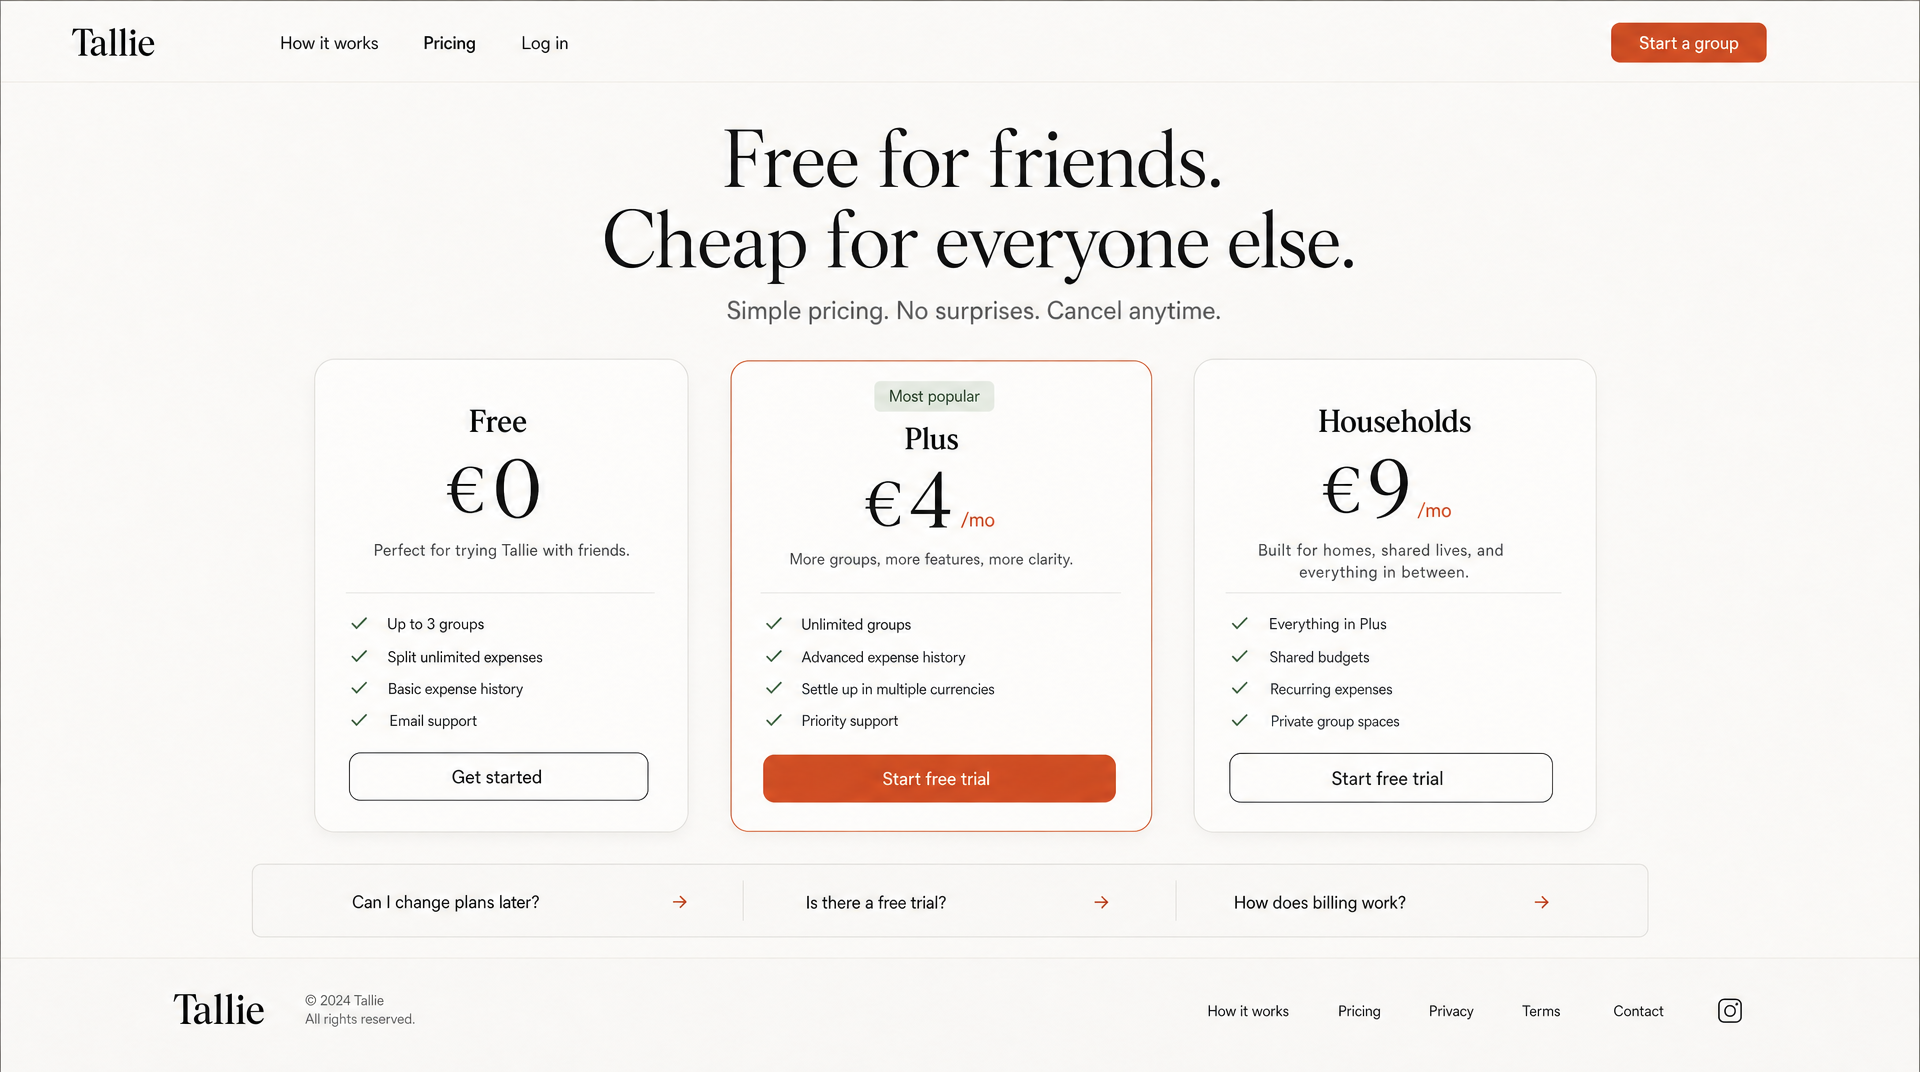 Second page, same visual system: identical nav, wordmark, type pairing, and accent color.
Same nav, same wordmark, same serif, same terracotta. Two pages, two credits, and I now have a visual spec instead of an adjective.
To hand it to Claude Code, save the image and drag it into the terminal, or paste it with Ctrl+V (Cmd+V works in iTerm2 on macOS). Then be specific about what the image is for:
[image] build the landing page in app/page.tsx to match this reference.
match the type scale, spacing rhythm, and color values exactly.
use tailwind, no new dependencies. then screenshot the result and
list every difference from the reference.
That last sentence is doing real work. It’s the verification check from Step 5, applied to design, and Anthropic’s docs explicitly recommend the pattern of asking Claude to screenshot its output and compare it against the original.
If you want the design half in more depth, I’ve covered designing UIs with Claude Code and the broader vibe design workflow elsewhere.
Step 4: Plan Before You Edit
Press Shift+Tab until the status bar reads ⏸ plan mode on, or start the session with claude --permission-mode plan. In plan mode Claude reads files and proposes an approach without touching disk.
Anthropic’s recommended sequence is four phases: explore, plan, implement, commit. Explore first:
read the auth and data layers and tell me how a group and its
members are currently modeled. don't write anything yet.
Then ask for the plan. When you get it, press Ctrl+G to open it in your editor and change it directly. Editing the plan takes thirty seconds and saves you from arguing with the implementation later.
Plan mode isn’t free, though, and the docs say so: if you could describe the diff in one sentence, skip it. Renaming a variable doesn’t need a plan. A change across five files does.
Step 5: Build in One Loop, With a Check Claude Can Run
Claude stops when the work looks done. If “looks done” is the only signal available, you become the verification loop, and every mistake waits for you to notice it.
Give it something that returns pass or fail instead. A test suite, a build exit code, a linter, a screenshot compared against your AIDesigner reference. Then ask for the check in the same message as the work:
implement the settle-up calculation from the plan. write tests for
the three-person case and the case where one person paid nothing.
run the suite and fix failures until it passes.
Compare that to “add settle-up,” which hands you back something plausible and leaves you to find out whether it’s right.
For longer autonomous stretches, a Stop hook can run your check as a script and block the turn from ending until it passes, though Claude Code overrides the hook after eight consecutive blocks. Hooks are deterministic in a way CLAUDE.md instructions aren’t. Instructions are advisory; hooks just happen.
Step 6: Review the Diff With Fresh Eyes
The session that wrote the code is the worst possible reviewer of it. It’s carrying every assumption that produced the change.
Delegate the review to a subagent, which runs in its own context window and reports back a summary:
use a subagent to review the settle-up diff against the plan.
check every requirement is implemented, the listed edge cases have
tests, and nothing outside scope changed. report gaps, not style.
Claude Code also ships a bundled /code-review skill that reviews the current diff for bugs in a fresh subagent.
One caution from Anthropic’s own guidance, and it matches what I’ve seen: a reviewer told to find gaps will find gaps, whether or not they exist. Chasing all of them produces defensive code and tests for impossible cases. Tell the reviewer to flag only what affects correctness, and treat the rest as optional.
Step 7: Commit, Then Clear
commit with a descriptive message and open a PR
Then run /clear before the next unrelated task. Claude’s context window holds the entire conversation, and performance degrades as it fills; the docs are direct that context is the fundamental constraint. A session that built your auth flow is actively worse at redesigning your pricing page.
The related rule: if you’ve corrected Claude twice on the same issue, stop correcting. The context is now full of failed approaches. /clear and rewrite the prompt with what you learned. A clean session with a better prompt beats a long session with accumulated corrections almost every time.
Why AIDesigner Is the Design Layer I Pair With Claude Code
Claude Code has an MCP client built in, which means it can call external tools directly. AIDesigner ships an OAuth-authenticated MCP server, so the design step above happens inside your Claude Code session rather than in another tab.
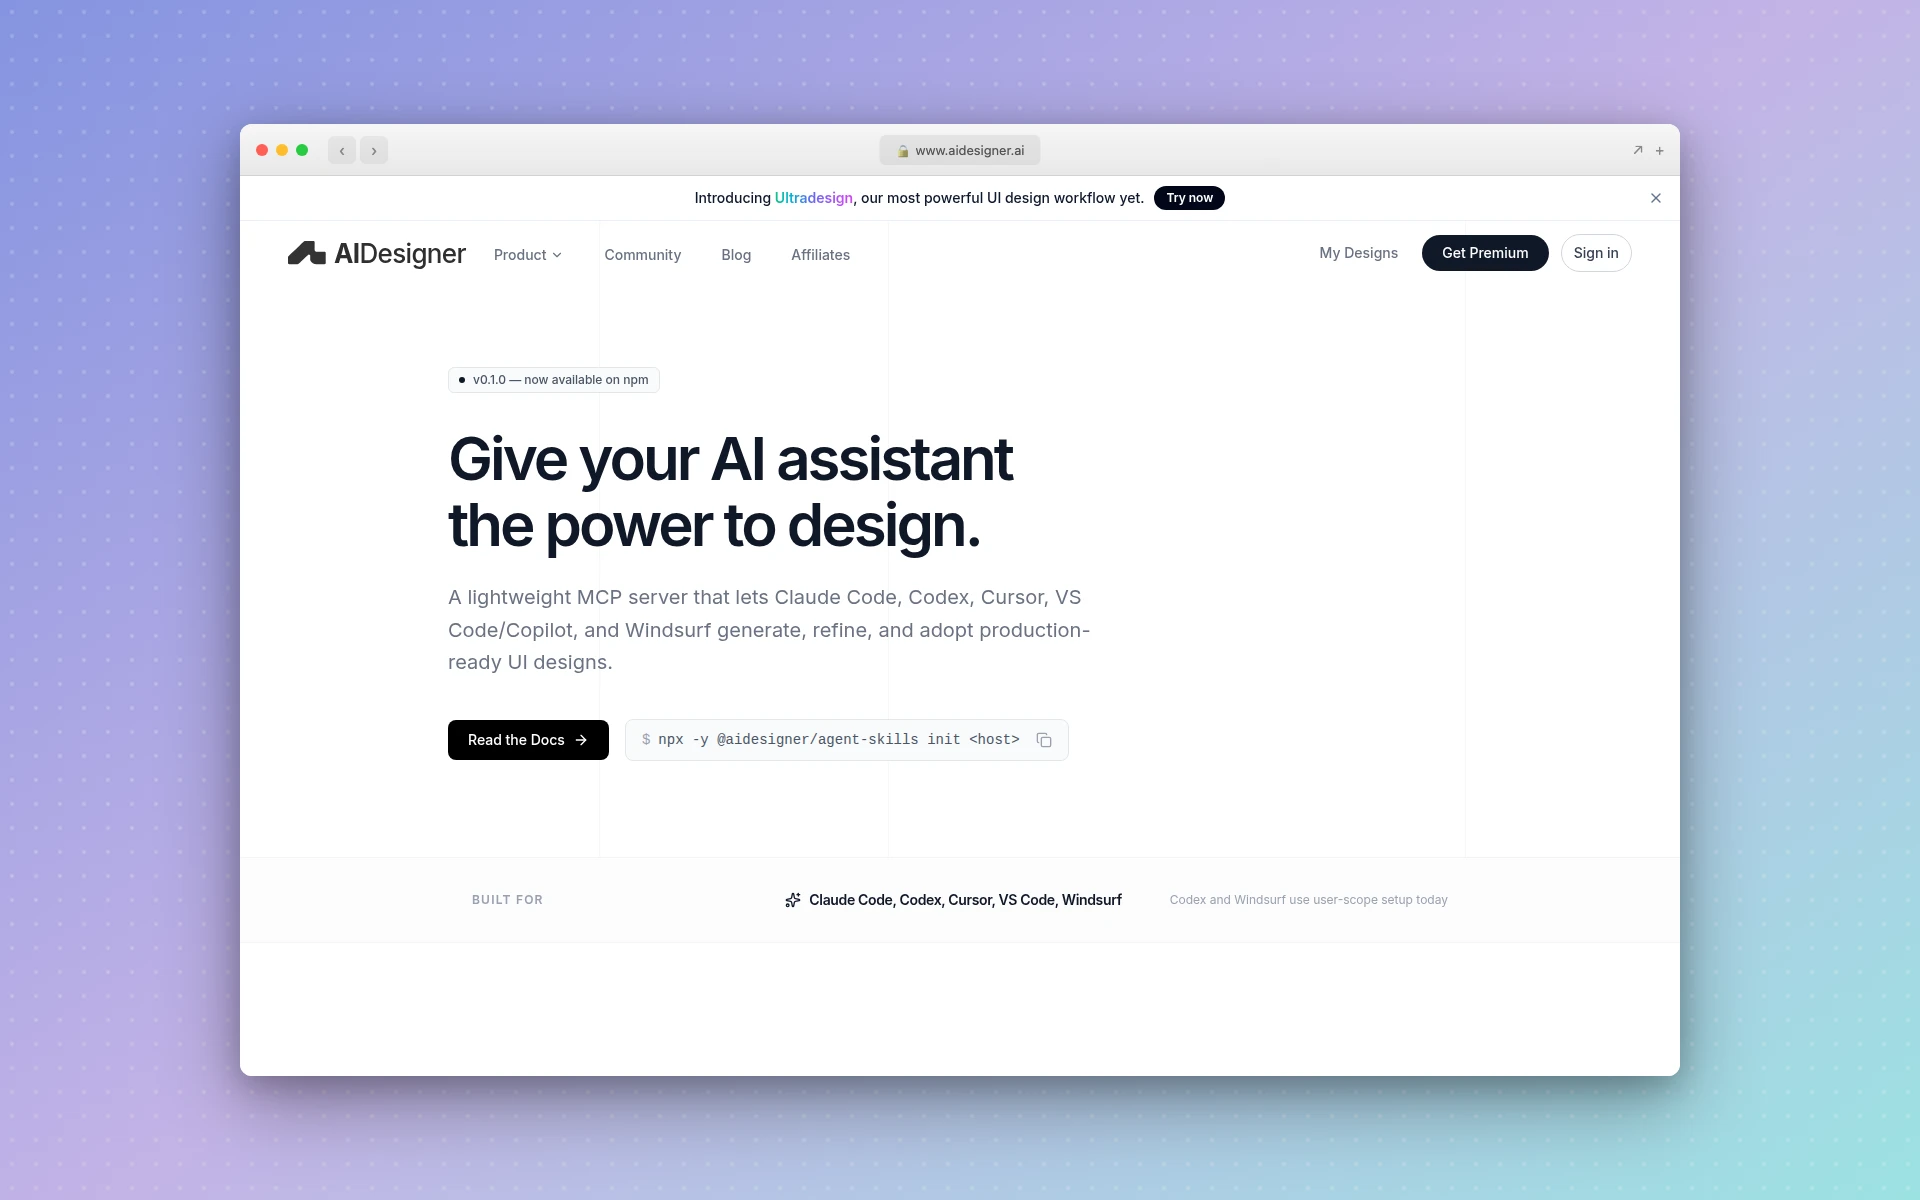 AIDesigner’s MCP server gives Claude Code a design layer it doesn’t ship with.
Once it’s connected, the agent can call tools by name:
| Tool | What it does |
|---|---|
generate_website_design_image | Generates a premium website reference image or page slice |
generate_design | Produces an editable HTML design artifact |
refine_design | Iterates on a previous design by run ID |
generate_branding_kit_variations | Generates a 3x3 board of nine distinct brand directions |
create_brand_kit_from_url | Extracts a reusable brand kit (palette, typography, imagery, art direction) from an existing site |
extract_image_assets | Pulls up to 12 embedded photos, logos, textures, or product shots out of a generated design into separate canvases |
Three things make this the pairing I’d recommend rather than a nice-to-have.
Brand kits solve the consistency problem structurally. You can build a kit two ways: generate a 3x3 variation board and save the tile you like, or point create_brand_kit_from_url at an existing website and let it extract the palette, typography, and art direction. Either way, you save it once and select it for any later generation. That’s the difference between a project that looks designed and one where page four drifted.
Reference modes cover the “make it look like that” case. Clone recreates a URL closely, Enhance modernizes it while keeping the content, and Inspire borrows the visual style only. Reference-mode generations cost 2 credits — one for analyzing the site, one for generating.
Asset extraction turns one generation into a component library. Generate a full page image, then pull the embedded photos, logos, and textures out into individual canvases you can drop onto the next design. Extraction bills separately: one credit per text-bearing asset, or one credit per three of everything else.
Wiring it up takes one command. The @aidesigner/agent-skills installer configures the MCP server, skill files, and slash commands for Claude Code, Codex, Cursor, VS Code, or Windsurf. If you’re auditing what else belongs in your setup, I keep a running list of the MCP servers worth installing.
On cost: AIDesigner’s free tier is 5 lifetime credits with no card. Pro starts at $25 per month for 100 credits and scales to $2,250 per month for 10,000, with yearly billing saving roughly 17%. One design generation is 1 credit. Image generation is 1 credit base, and high-quality output in the square and ultra-wide formats (1:1, 21:9, 9:21) costs 2. Both Tallie pages above were high-quality 16:9, and each billed exactly 1 credit.
Common Mistakes
Asking for the whole app in one prompt. Claude has to guess your data model, auth flow, and user roles, and it guesses wrong in ways that surface three features later. Build one slice at a time.
Letting one session do everything. The kitchen-sink session — a task, then something unrelated, then back to the first task — leaves the context full of noise. /clear between unrelated work.
Treating checkpoints as backups. Every prompt creates a checkpoint you can rewind to with Esc Esc or /rewind, which is genuinely useful for trying risky things. But the docs are explicit that checkpoints only track changes made through Claude’s file-editing tools. Anything done via a Bash command isn’t captured. Commit regularly.
Prompting the coding agent to “make it prettier.” You’ll get a different arrangement of the same defaults. Change the reference, not the adjective.
Skipping review on anything sensitive. Vibe coding gets you to something real fast. Authentication, payments, and user data still need a human who can read the diff.
Pro Tips
- Let Claude interview you first. For anything substantial, ask it to interview you with the
AskUserQuestiontool and write a spec before implementation, then start a fresh session to execute it. Clean context, written spec. - Run parallel sessions in worktrees.
claude --worktree feature-authgives you an isolated checkout so a second session can’t collide with the first. - Use
@instead of describing where code lives.@src/lib/split.tsputs the file in context immediately. - Generate the design at the viewport you’re targeting. For HTML designs, AIDesigner starts at 1440px desktop or 430px mobile, and the markup it produces is responsive from there.
- Name your sessions.
/renameplusclaude --resumeturns conversations into branches you can come back to.
Frequently Asked Questions
What is vibe coding with Claude?
Vibe coding with Claude means describing what you want in plain English and letting Claude Code plan, write, and verify the code across your files while you review outcomes rather than every line. In practice it’s a loop: give Claude context, plan the change, let it build against a check it can run, then review the diff before committing.
Do you need to know how to code to vibe code with Claude?
No, but you need judgment. Claude Code will happily build something that runs and is still wrong, so you need to describe what you want precisely and tell whether the result is right. Non-developers get furthest on small, self-contained projects. Anything touching authentication, payments, or user data needs someone who can read the diff.
How much does it cost to vibe code with Claude?
Claude Code is included with a Claude subscription. Anthropic lists Pro at $20 per month billed monthly or $17 per month annually, and Max starting at $100 per month. Pairing it with AIDesigner for the design layer starts free (5 lifetime credits, no card), and AIDesigner Pro is $25 per month for 100 credits.
Why does vibe-coded UI always look generic?
Coding agents optimize for working software, not visual design. With no art direction in the prompt they fall back on default component libraries and safe spacing, so everything converges on the same look. The fix is generating the design first in a tool built for it, like AIDesigner, then handing that image to Claude Code as the visual spec.
Should I use plan mode for everything?
No. Anthropic’s own guidance is to skip planning when you could describe the diff in one sentence, like a typo fix or a renamed variable. Plan mode earns its overhead when the change spans multiple files, when you’re unsure of the approach, or when you’re working in code you don’t know well.
Is Claude Code or a browser-based builder better for vibe coding?
Claude Code is better when the code lives in a real repository you intend to keep, because it works across your existing files and git history. Browser builders are better for starting from nothing with no local setup. For the design half of either workflow, AIDesigner is what I’d pair with it, since neither the agent nor the browser builder is doing art direction for you. If you’re still choosing an agent, I compared Claude Code and Cursor and ranked the broader field of AI coding tools.
Start With One Real Project
Pick something small enough to finish and real enough to care about. Generate the design first, write a short CLAUDE.md, plan in plan mode, and give Claude a check it can run. Then review the diff before you believe it.
The design step is the one worth adding today if you’re only going to add one. Claude Code will write you working software regardless. Working and good-looking are separate problems, though, and only one of them is the agent’s job.
Try AIDesigner free — 5 lifetime credits, no card required. Connect the MCP server to Claude Code and generate your first reference before you write a line of code.